The following tutorial will teach you the things you need to know to start your C++ Programming Journey. Everything has been made simple to understand and screenshots of the code have been provided to help you understand what we are doing.
To start off, you will need to have:
-A Compiler (This is what runs your program, without this you will never be able to view what you have programmed)
You can find compilers and code editors for all operating systems. A highly recommended compiler for Mac users would be XCode. I will use XCode throughout all of the tutorials.
Got your compiler yet? Great! Now we can start writing your first program. First of all, you must create a new project. To do this in XCode simply do the following:
1. Press 'Create a new XCode project'.
2. Press 'Command Line Tool'.
3. Type in your projects name into the 'Product Name' input box.
4. Select the language to be 'C++' (XCode can compile Swift, C, Objective C and C++)
5. Press 'Next'.
6. Tick the 'Git Repository' Box.
7. Press 'Create'.
8. Press 'main.cpp'. This is where you will write your code.
Well done you have opened up a command-line project in XCode (You will have to find tutorials online for those of you who are Linux and Windows users).
Now we can start coding.
First of all, you will need to get rid of all of the code that you see in the 'main.cpp' file. We will not be making a 'Hello World!' program. Once you have done that, write the following code.

So, what is this code doing.
The line: #include <iostream> calls a module. What is a module? A module is basically a library of new lines of code for C++ to use. In almost every single program, the 'iostream' library is used. So, whenever you start up a new program, write that into your code first thing!
Next we have the 'using namespace std' line. So what is this doing? It is talking about a namespace and something called std? What is that?
A namespace specifies what kind of functions we will be using in our program. Sometimes, if we are using a range of different types of functions, it is better to not use this line of code. Since we are making a simple program though, it is okay to use it.
The types of functions we are using are standard functions. Pretty much the most simple kinds of functions that C++ uses.
Next comes the main loop, this is where we will store the main skeleton of our program. Also, this will help distinguish the main program from a void function. Do not worry, we will look into void functions later on in the course.
So, we now understand everything we have written. But, there is something we need to add to it. These are the variables we will be using. Now write the following into your program:

So, what is 'string input'? This is declaring a variable that we will be using. We must always declare variables and what type of variable they are. Now, this brings up another question? What are the different variable types?
Here are all of the variable types:
Number Variable Types:
int - int is a number variable type. It is a whole number, so you cannot store decimals in an int variable. Int is mostly useful when performing simple calculations.
float - float is a number variable type. It is a decimal number. However, it cannot store large decimal numbers. This is also useful in simple calculations that require decimals.
double - double is a number variable type. These kinds of variables can store way larger decimal numbers. For example, double can store the number pi, unlike int and float.
Text Variable Types:
string - string is a text variable type. It can also support numbers. However, these numbers cannot be used in calculations. So if you wanted to add a string variable called apples that was equal to "8" and an int variable called pears that was equal to 9, then you would not be able to do that. Also, whenever you want to check whether a string variable is equal to something in an if statement, the thing you want to see whether it is equal to must be surrounded by speech marks.
Now that we understand variable types, we must also understand how we structure the commands and where we put it.
Here is the structure:
variableType variableName;
These kinds of commands usually appear before the variable it declares is used (If you do not declare the variable before it is used, the compiler will not know what you are referring to).
Now we understand variables and how to declare them.
By the way, string variable types must be declared differently if you do not use the std namespace. When you have not yet declared the std namespace you must put std::string instead of just string. Also, if you do not want to use the std namespace then you must also put std::string instead of just string.
Now lets move on!
The next thing you must write into your code is the following:

What is 'cout' and 'cin'? Well, the 'cout' command prints something to the screen. To structure a 'cout' command, we have to write:
cout << (Here is where you put the text or variable name you want to render. If it is text then you must put it in speech marks. However, if you are going to write a variable name, you just have to write the variables name without speech marks.) << endl; (the endl command starts a new line)
We can easily variate on the 'cout' command. We will see how to do this later on in the tutorial.
The next command used is the 'cin' command. Here is how to structure a 'cin' command:
cin >> (the variable we are asking the value for or are wanting an input for);
We do not need an 'endl' command in this line of code as to send the input to the program we have to press enter. This would create a new line for us in the command line.
Now we understand how to structure our 'cin' and 'cout' commands. Now we can move on.
Write the following into your program:

Here we have made an if statement. If statements in C++ are structured like this:
if (expression or statement)
{
}
This can also be extended by adding an else if or else statement right below it. Here are how they are structured. Else statements must always come at the end. Else if statements can come at the end but not the start of an if statement.
Else statement structure:
else
{
}
Else if statement structure:
else if (expression or statement)
{
}
Here is an example of an if statement, along with an else if and else statement joined with it. (Remember, the else if or else statement must come right after the if statement, otherwise they will not work)

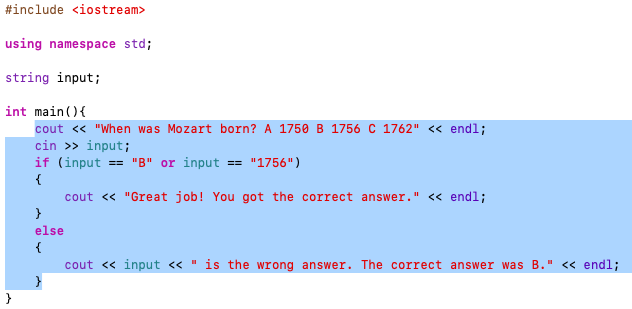
Do not write the code to the right of this paragraph at all. Now, that we understand if statements we can move on.

Now go over your program and add in the new lines of code and the changes.
In this code, we have added some commands that will run depending on whether we got the correct answer or not. These pieces of code must be indented. Indenting means putting spaces before writing a command. Basically, indenting is placing a command on a column in the piece of code. An if statement will always shift the code inside of it by 1 indent.
In most programming languages, 1 indent is equal to 4 spaces. Sometimes though, 1 indeint is equal to 2 spaces. Do not worry, C++ will always have it so 1 indent is equal to 4 spaces. Also, C++ indents for you so there is no need to worry about indenting manually. Because of this, indents will not get in your way.
However, if you have ended with an if statement, you must click out of it by going to a space a few lines after it. Sometimes, if your code is not in line with the code before the if statement, you will have to press the backspace key to go back by 1 indent. Usually though, you will not have to do this. This is a useful thing to know though, as indents can sometimes cause errors in your code. They are easily fixable, but sometimes annoying when they become an error.
Now going away from indents, you may notice the word or inside of the if statement. 'Or' and 'and' statements allow for us to put more expressions and statements inside of an if statement. Here are what these new statements do:
Or - Or statements check whether one of the two expressions or statements on either side of it are true.
And - and statements check whether both of the two expressions or statements on either side of it are true.
Now we understand 'or' statements and 'and' statements.
The next thing you may of noticed is the line:
"cout << input << " is the wrong answer. The correct answer was B." << endl;"
This line of code is basically joining a variable with a string. This can be useful in quite a lot of instances. For example, when we want to show the score that someone has in a console game and want to use as few lines as possible, we can use a command structured similarly to the one above.
Another new thing you may of noticed is how cout has the << signs and cin has the >> signs. This is to help distinguish the two from each other to the compiler.
A good way to remember what signs to use is:
"There is more in, but less out."
This is because the greater than signs are used in the cin command, and the lesser than signs are used in the cout command.
You have now made the basic structure for a quiz! Well done!
If you want to extend the quiz simply, copy and paste the highlighted parts in the code below:
Using what you know now, try to find out what things you need to change to make new questions.
