This tutorial will introduce basic math to our C++ knowledge. First of all, let's create the main loop. It is recommended you look at the previous tutorial before you continue.
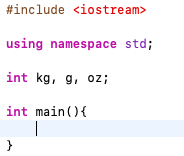
This is our main loop. We will be using the iostream module and will also be using the variables, kg, g and oz. You may of noticed how we declared the variables this time. Here are some differences:
1. We wrote int instead of string.
2. We wrote:
int kg, g, oz;
instead of:
int kg;
int g;
int oz;
The 1st one isn't much of a difference and you should understand the difference from terminology learned in the previous tutorial. The second difference however is something you might want to remember. Writing int kg, g, oz; is basically a simplified version than int kg; int g; int oz;. It is good to do this as you can save the amount of lines you write in your code by a lot.
However, int kg, g, oz string input; would not work. The string input would have to be put on a seperate line as it is a different variable type.
Now going onto the program we are making in this tutorial.
This program will ask for an input from the player. The player will have to put in a number. This number will be seen as a weight in kg.
After this the program will convert the weight to both g and oz. It will then tell the player:
kg is oz ounces and g grams.
To start off lets add in a cout command that will tell the player to input a weight in kg. We can then write a cin command that will get an input from the player. We will be putting in cin >> kg; as we are asking for an amount in kg.

There is nothing to go over here as we have already went over the cout and cin commands. Always remember the mnemonic we went over in the previous tutorial:
"There is more in, but less out."
to help you remember whether to use '<<' or '>>'.
Next, we will have to see how to set a variable to an amount.
Remember the thing about the 2 equal signs from the previous tutorial. It stated how we have to use 1 equal sign when setting a variable to something.
Knowing this we can have a good idea of the structure. When we want to set a variable to something we have to follow the structure:
variableName = value;
If the variable is a string we must do:
variableName = "value";
instead.
Now that we know how to set variables to values/strings, lets add some new things to our code. We will go over these new things after you write it in.

These new lines of code are what will convert our input into both g and oz.
Since 1kg = 1000g we know that g = kg * 1000.
Since 1kg = 35.274oz we know that oz = kg * 35.274.
What does the asterisk mean in these sums? Well, the asterisk is pretty much a computational version of the multiply symbol, 'x'. Also, the computational version of the divide symbol is '/'. It is good to remember this as the compiler will not understand what you mean by the usual multiply and divided symbols.
We have now created a basic calculation inside of our program. The next thing to do is show this info to the player. Let's see how to do this:

In the 'cout' command, our data is being combined into a single sentence. The << symbols separate each piece of info we want to combine together in this command.
Also, each and every variable name is not put in speech marks. However, the strings of text, that are not variables, are put into speech marks.
The speech marks help the compiler distinguish the variables from the strings of text.
Now we understand how to join pieces of data together.
Also, each and every variable name is not put in speech marks. However, the strings of text, that are not variables, are put into speech marks.
The speech marks help the compiler distinguish the variables from the strings of text.
Now we understand how to join pieces of data together.

Hmm... Did you notice that. It says that 1kg is 35oz. That is wrong. It should actually be 35.274oz. Our converter will need to be as accurate as we can get it so let's fix this.
To fix the error, take a look at the variable declaration section. The error is somewhere here.
To fix the error, take a look at the variable declaration section. The error is somewhere here.

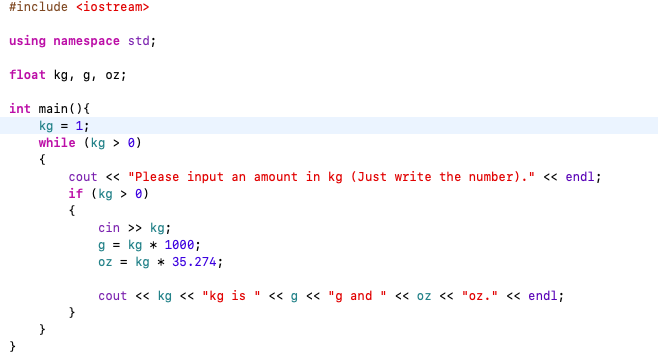
The error here is our variable type. The variable type should actually be 'float'. Since 35.274 is a decimal we cannot store it as an int, which would always store it as a whole number.
So, since 35.274 is a decimal we must make the variable type a 'float' instead of an 'int'.
You have now finished making a weight conversion tool in C++. But there are some more things we can add to it. Let's add them!
So, since 35.274 is a decimal we must make the variable type a 'float' instead of an 'int'.
You have now finished making a weight conversion tool in C++. But there are some more things we can add to it. Let's add them!
This new feature will stop invalid pieces of data being entered into the program. Invalid pieces of data in this program will be pieces of data that are not bigger than 0.
To stop this, I have added a while loop.
What is a while loop? Well, while loops allow things to go on for a certain amount of time whilst something is true.
How do we structure a while loop? To structure one look at the following:
while (expression or statement)
{
}
The expression or statement part of this structure can be replaced with something like:
while (apples == 0)
{
}
We must do the two equal signs thing again, since we are not setting apples to 0 in this piece of code.
Inside the while loop we can add a command. Let's add something:
while (apples == 0)
{
cout << "You have got no apples." << endl;
}
We can add more while loops inside a while loop. For example:
while (apples == 0)
{
cout << "You have got no apples." << endl;
while (location != "tree")
{
cout << "Go to a tree to get some apples." << endl;
}
}
What is the exclamation mark doing here? Well, if we put a != instead of an == we are making it say is this not equal to instead of is this equal to. So, when you want to check whether something is not equal to something use != instead of ==.
Now we understand what while loops are.
What is the kg = 1; command doing here. Well, this command makes it so the while loop will start. It is not needed, but in case of there being a bug this can be quite useful.
Inside the while loop there is an if statement that is checking whether kg is bigger than 0. This is so the program does not do any calculations and outputs anything onto the screen. Since the input will not be bigger than 0 the while loop will stop. Let's make it so it tells the player they have input an invalid piece of data.

The reason why the 'cout' command has been placed where it is, is because the while loop will only end when a piece of data entered is invalid.
This new feature will now make our project be able to detect invalid pieces of data. This will be helpful in certain scenarios.
You have now made a weight conversion tool.
Please wait for the next tutorial. I will put a button here when it is done.
This new feature will now make our project be able to detect invalid pieces of data. This will be helpful in certain scenarios.
You have now made a weight conversion tool.
Please wait for the next tutorial. I will put a button here when it is done.
